A Step-by-Step Guide: Creating Your Own Balloon Centerpieces
Are you looking for a fun and creative way to elevate your next party or event? Then you’re at just the right place! In this step-by-step guide, we’ll walk you through how to create your own stunning balloon centerpieces that are sure to wow your guests. Whether its hosting a birthday, wedding, baby shower, or even a corporate event, balloons can instantly transform a space and give it that extra touch of personality.
Balloon centerpieces are a fantastic way to add a pop of color and charm to your décor while staying within budget. From gathering supplies to designing unique arrangements, we’ve got you covered. Let’s get started!
Step 1: Gather Your Supplies
Before you start crafting your masterpiece, you’ll need to gather all the necessary materials. Luckily, creating balloon centerpieces doesn’t require much, and most of the items can be easily found at your local party supply store, online or right here at Wonder Balloons! Let’s get gathering:
Essential Supplies:
- Balloons: The star of the show! Choose balloons in a variety of colours, shapes, and sizes. You can go with latex or foil balloons, depending on your desired look. Latex balloons come in a wider range of colours, while foil balloons often feature fun shapes or themes.
- Balloon Pump: If you’re working with a lot of balloons, a hand pump or electric pump will save you lots of time and effort.
- Balloon Weights: To keep your balloons in place, you’ll need weights that anchor your centerpiece arrangement. You can buy specialty balloon weights or use decorative items like sand-filled bags or vases.
- Floral Tape or Balloon Glue Dots: To help secure balloons together or attach them to a base, these materials will come in handy.
- Clear Fishing Line or String: This is useful if you want to create floating balloon arrangements or secure balloons to a weight.
- Scissors: Always handy to have for trimming excess string or balloon ribbons.
- Base: A solid base to attach your balloons to is crucial for stability. You can use a floral foam block, a vase filled with sand or water, or even a custom-designed stand.
Optional Decorations:
- Ribbon or Tulle: Adds an elegant touch and can help tie the centerpiece together.
- LED Lights: For extra luminosity, consider adding small LED lights or glow sticks inside or around the base of your centerpiece.
- Flowers or Greenery: For that extra touch of beauty, by adding a few faux flowers, leaves, or other natural elements can enhance the design and make your centerpiece even more eye-catching.
Step 2: Decide on the Theme or Colour Scheme
Before you start inflating balloons, it’s important to have a clear vision of the overall look and feel of your centerpiece. What theme or colour scheme will match your event? Your colour choices will set the tone, so it’s worth spending a little time considering the mood you want to create. You can also find some incredible inpsirations at Wonder Balloons!
Ideas for Colour Schemes:
- Bold and Bright: Choose vibrant colours like red, yellow, and blue for a fun and energetic vibe. Great for birthday parties and children’s events!
- Pastels: Soft shades of pink, lavender, and baby blue are perfect for baby showers or weddings.
- Metallics: Gold, silver, and rose gold balloons can add a touch of luxury and sophistication to any event, making them perfect for anniversaries or New Year’s Eve parties.
- Themed Designs: If you’re planning a themed event, like a tropical luau or circus party, consider using themed balloons in the appropriate shapes and colours.
Once you’ve chosen your theme or colour palette, it’s time to move on to the best part—arranging your balloons!
Step 3: Inflate the Balloons
Now that you’ve got your supplies and theme in place, it’s time to inflate the balloons. This step is simple but essential for creating a polished and symmetrical look. You can use a hand pump for smaller parties or an electric pump for larger events.
Tips for Balloon Inflation:
- Do not Overinflate: Overinflating can lead to popped balloons, so aim for a consistent size across all balloons.
- Vary Sizes for Interest: Mix different balloon sizes to create depth and interest. Larger balloons can serve as focal points, while smaller ones add texture.
- Helium or Air?: Decide whether you want your balloons to float (helium) or stay stationary (air-filled). Helium-filled balloons are great for floating centerpieces, while air-filled balloons are perfect for anchored arrangements.
Step 4: Build the Base for Your Centerpiece
The base of your balloon centerpiece is essential for giving it structure and stability. You can either go for a traditional base like a floral foam block or get creative with a unique container. Here are some ideas for different types of bases:
Floral Foam Block:
- How to Use It: Simply cut the foam to fit your vase or container and insert your balloons into it. The foam will hold the balloons securely in place. You can also add faux flowers, ribbons, or other decorations to make it more visually appealing.
Vases or Containers:
- How to Use It: Fill a vase or container with sand, water, or rocks to add weight. You can attach the balloons to the top using string or glue dots, ensuring they stay anchored while giving your centerpiece a clean, modern look.
Step 5: Arrange Your Balloons
Now comes the fun part: assembling your balloon centerpiece! This step allows for plenty of creativity, and you can arrange the balloons in all sorts of positions and styles.

Basic Balloon Cluster:
- Group 3-5 Balloons: Start by grouping a few balloons together. You can either tie the balloons in a cluster or use balloon glue dots to stick them together.
- Attach the Cluster to the Base: Secure the cluster to your base using fishing line or more glue dots. If you’re using multiple clusters, make sure they are evenly spaced to avoid overcrowding.
- Layering for Depth: To create more depth, layer your balloons. Position larger balloons in the back and smaller ones in front.
Balloon Arch or Garland:
If you’re feeling more adventurous, you can create a balloon arch or garland to drape over your centerpiece. This works great for weddings, large parties, and events that need extra flair. To make a balloon garland, simply string your inflated balloons onto a fishing line, securing them with tape as needed.

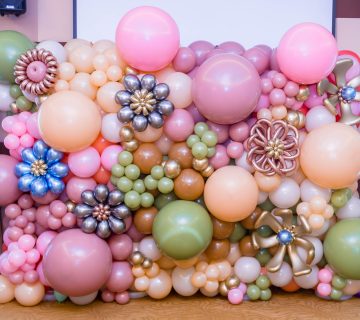
Step 6: Add Finishing Touches
Finally, it’s time to add any additional decorations that will make your centerpiece stand out. Consider ribbons, LED lights, flowers, or even small figurines to complement the balloons. A little extra detail is all you need to bring it all together!
Optional Finishing Touches:
- Tulle or Ribbon: Wrap ribbons around the base or let them cascade down for a dramatic effect.
- LED Lights: For a night-time event, incorporate LED lights inside your balloon arrangements or around the base to create a cozy, glowing ambiance.
- Floral Elements: Adding small faux flowers around the balloons can help ground the arrangement and add a natural touch.

Step 7: Display Your Centerpieces
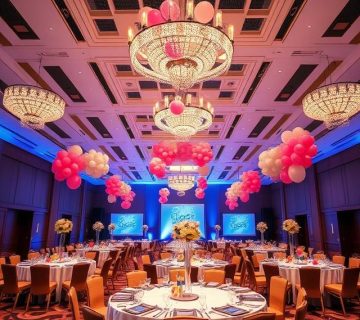
Once your balloon centerpieces are complete, it’s time to showcase them at your event! Place your creations in strategic spots—on guest tables, near the entrance, or even as a backdrop for photo opportunities. Balloons are the perfect way to draw attention and make your party atmosphere extra festive.
Creating your own balloon centerpieces is a fun, creative, and budget-friendly way to add some flair to any event. By our vast selection at Wonder Balloons, with just a few supplies and a touch of imagination, you can craft stunning arrangements that will make your party unforgettable! Whether you use our quality latex balloons or explore our diverse centerpiece options, you’ll be tapping into a world of colourful possibilities!
So, roll up your sleeves, grab those balloons, it’s time to get crafting! — and watch as your DIY skills wow everyone around you (leave some jaws dropped). Happy decorating!